CROCHETED HOME DECOR - FREE CROCHET PATTERN & VIDEO TUTORIAL
PolushkaBunny Patterns
Oct 5, 2020
Fall… Days are getting shorter, nights are getting colder, light rain falls oftener. And your mood, just like the temperature, is getting down little by little. That is why a warm and cozy house is a must to make you feel better and drive away sadness and gloom from your life.
The nature itself changes the world around us, trying to make it brighter and more colorful - to protect us from autumn sadness and anxiety. Just look around - it has it all – all the shades of red, yellow, terracotta, green and brown colors. So bright, beautiful, and extremely cozy. And immediately you feel like decorating your house using the same shades and colors for it.
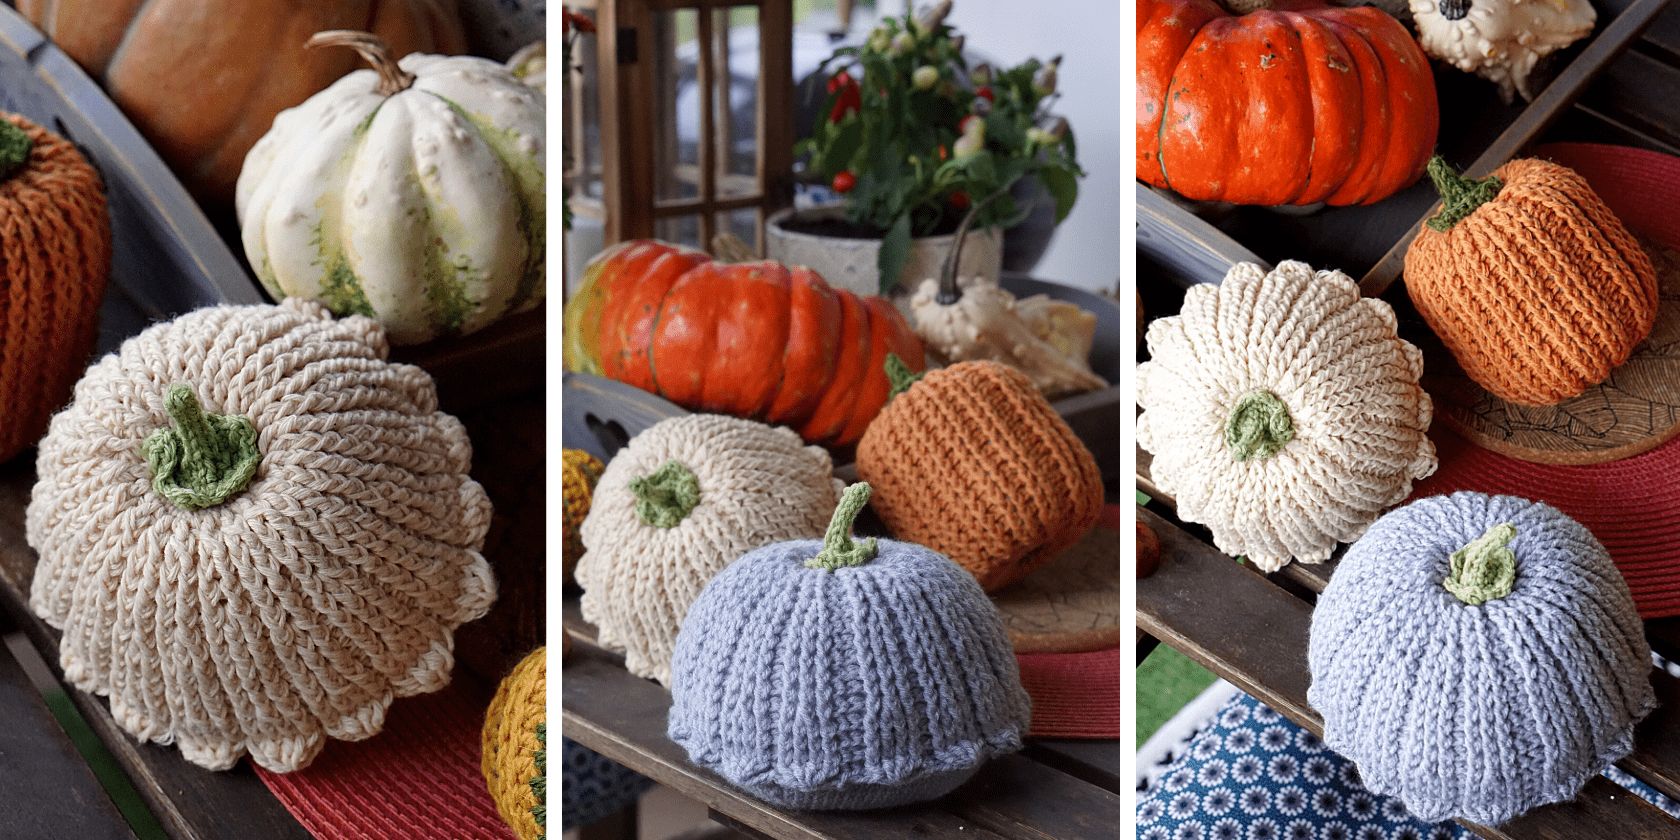
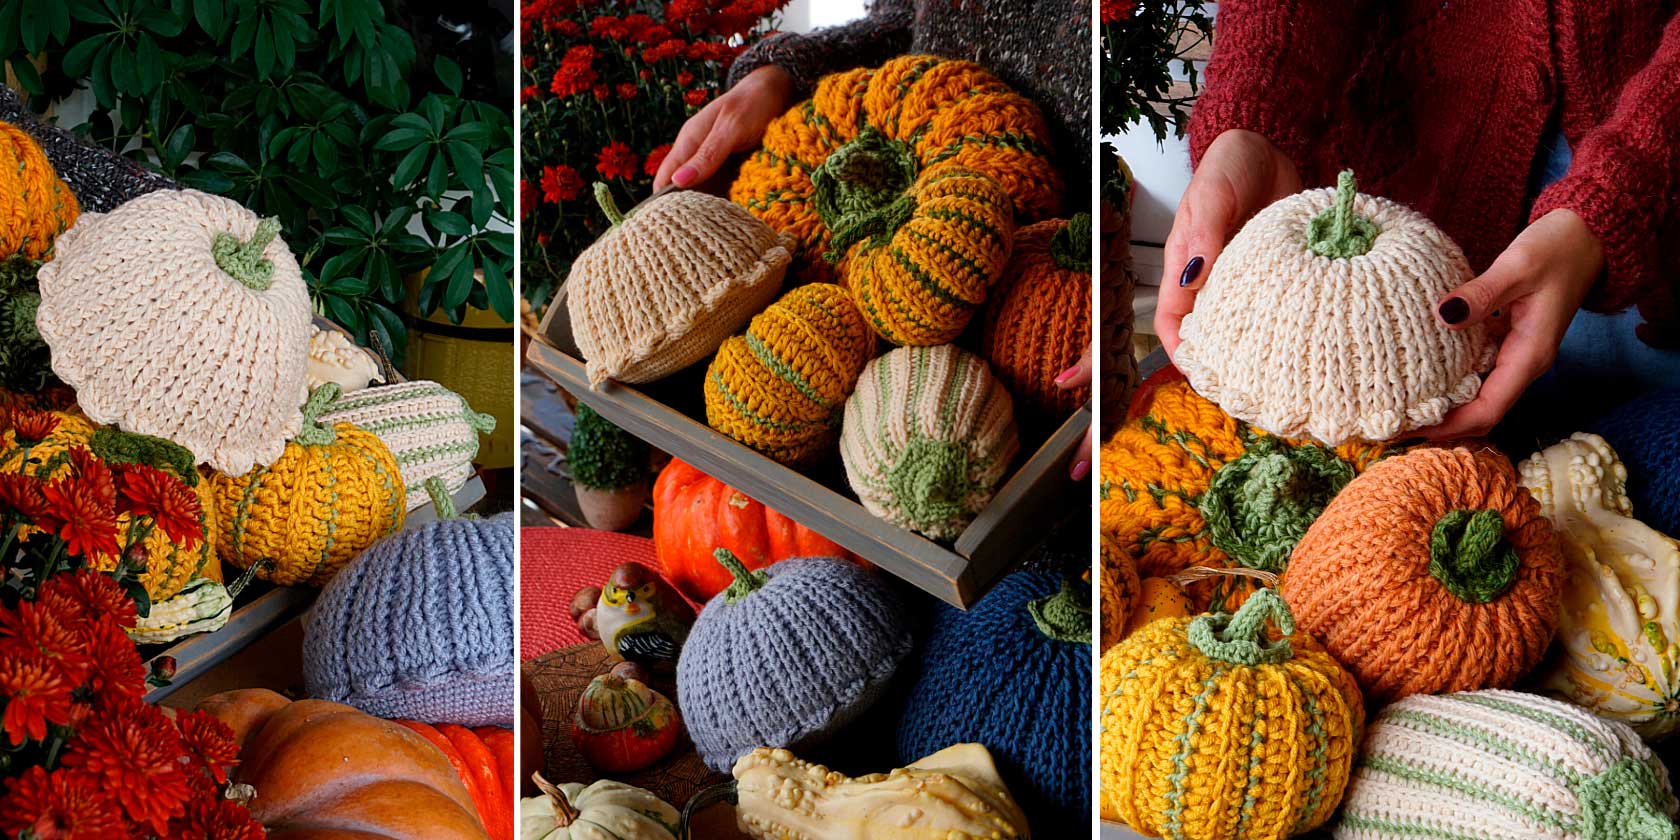
I have made a collection of crocheted autumn seasonal vegetables to decorate my apartment terrace. I have it all – the pumpkins, pattypans, zucchini. Every morning, having my coffee or every evening, relishing my honey and cinnamon hot tea or glass of vine, I relax and enjoy it there.
Let’s crochet these cozy vegetables together! My free crochet pattern and video tutorial will help you make this nice little pattypan thing today.
To crochet it, take a yarn ball (any type of it) and a crochet hook that has matchable characteristics. It will take around 170 meters of the main color to make the vegetable; plus around 15 meters of additional color to make the vegetable tail.
To make this white pattypan I took Lanosso Natural Merino yarn (50% wool, 25% viscose, 25% polyester) 901 color( light beige), 280m per 100g; 2.5 mm hook.
To crochet my blue vegetable I took YarnArt BABY yarn (acrylic, 100%); 150m per 50g, 2.5 mm hook. The crocheted pattypan diameter is about 16 cm.
I used Drops Lima to crochet the pattypan tail.
You can take any kind/type of yarn for this particular crochet project; it is not that critical here. Use any yarn you have. The one that is nice, soft to the touch, that will make your crocheting even more enjoyable. Knitting and crocheting are the best remedy when it comes to autumn sadness. Am I right? Don't forget visit my website www.POLUSHKABUNNY.com SUBSCRIBE to get PDF version
So, let’s start? ------------------------------------------------------------
FREE CROCHET PATTERN [...] | work into one stitch Ch | chain stitch SC | single crochet DC | double crochet BPdc | back post double crochet FPdc | front post double crochet Inc | Increase (work 2 SC into one stitch) sl st | slip stitch joining sl st | joining slip stitch (used in case of crocheting in joining rounds; worked into 1st/2nd chain of round; Ch+sl st = 1 stitch) rd | round FPdc4tog | Front post double crochet 4 together FLO | front loop only ------------------------------------------------------------ I HOPE YOU ENJOY! ♥
VIDEO TUTORIAL
WRITTEN CROCHET PATTERN | PattyPan | STEP 1 | Patty pan Upper part (till 4th Rd crochet in continues rounds) | Rd 1 | 6SC in magic ring | 6 | Rd 2 | 6 Inc | 12 | Rd 3 | *(SC, Inc)from*rep x6 | 18 | Rd 4 | *(SC, Inc, SC)from*rep x6 | 24 | Rd 5 | From this rd work joining rounds. Ch, *(DC, [2DC])from*rep x12, joining sl st | 37 | Rd 6 | 2Ch, *(BPdc, [2FPdc])from*rep x18, joining sl st | 55 | Rd 7-8 | 2Ch, *(BPdc, 2FPdc)from*rep x18, joining sl st | 55 | Rd 9 | 2Ch, *(BPdc, 2FPdc, BPdc, FPdc, DC in between stitches, FPdc, BPdc, 2FPdc)from*rep x6, joining sl st | 61 | Rd 10 | 2Ch, *(BPdc, 2FPdc, BPdc, 3FPdc, BPdc, FPdc, DC in between stitches, FPdc)from*rep x6, joining sl st | 67 | Rd 11 | 2Ch, *(BPdc, FPdc, DC in between stitches, FPdc, BPdc, 3FPdc, BPdc, 3FPdc)from*rep x6, joining sl st | 73 | Rd 12-14 | 2Ch, *(BPdc, 3FPdc)from*rep x18, joining sl st | 73 | Rd 15 | 2Ch, *(BPdc, FPdc, [2FPdc], FPdc)from*rep x18, joining sl st | 91 | Rd 16-17 | 2Ch, *(BPdc, 4FPdc)from*rep x18, joining sl st | 91 | Rd 18 | *(3Ch, FPdc4tog, 3Ch, sl st FLO)from*rep x18 | 18 scallops | STEP 2 | Pattypan Bottom part (continues rounds) | Rd 1 | 6 SC in magic ring, tighten | 6 | Rd 2 | 6 Inc | 12 | Rd 3 | *(SC, Inc)from*rep x6 | 18 | Rd 4 | *(SC, Inc, SC)from*rep x6 | 24 | Rd 5 | *(3SC, Inc)from*rep x6 | 30 | Rd 6 | *(2SC, Inc, 2SC)from*rep x6 | 36 | Rd 7 | *(5SC, Inc)from*rep x6 | 42 | Rd 8 | *(3SC, Inc, 3SC)from*rep x6 | 48 | Rd 9 | *(7SC, Inc)from*rep x6 | 54 | Rd 10| *(4SC, Inc, 4SC)from*rep x6 | 60 | Rd 11| *(9SC, Inc)from*rep x6 | 66 | Rd 12| *(5SC, Inc, 5SC)from*rep x6 | 72 | Rd 13| *(11SC, Inc)from*rep x6 | 78 | Rd 14| *(6SC, Inc, 6SC)from*rep x6 | 84 | Rd 15| *(13SC, Inc)from*rep x6 | 90 | Rd 16-19 | 90SC. Don’t cut off thread (we will use it for sewing) | 90 | STEP 3 | Stem | 1 | Green yarn. Make an i-cord of 4 sts about 3cm(watch my video). Don’t cut off thread| | Rd 2 | slip 3 stitches from the hook and Chain 1 into 1st of i-cord, *(SC into stitch between i-cord stitches, SC into next i-cord stitch)from*rep x3, SC into stitch between i-cord stitches | 7 | Rd 3 | 7 Inc | 14 | Rd 4 | *(SC, Inc)from*rep x7 | 21 | Rd 5 | *(SC, Ch, DC, Ch, 2SC)from*rep x5, sl st| | STEP 4 | Blossom end | Rd1 | 6SC in magic ring, tighten | 6 | Rd 2 | 6 Inc | 12 | Rd 3 | *(SC, Inc)from*rep x6 | 18 | STEP 5 | Assemble and stuffing | Arrange 2 details right side facing each other. Stitch it together with SC working into both loops(front and back) of both fabrics. Leave a small opening (about 10stitches) and turn right side out. Leave a long tail for sewing (about 30cm). Stuff the pattypan. | Close the opening with sewing needle and the yarn tail | Attach the stem and the blossom end flattening the pattypan a bit (watch my video tutorial) ------------------------------------------------------------
I have lots of other vegetables here :) Just tell me which one you want to make next time. If there are any questions, please, feel free to ask, I would love to help you. Post your pictures of your patty pans on social and tag it #polushkabunny to be futured ♥
Hello, I'd love to have the pattern for that huge pumpkin in Pumpkin Decor pic that you are placing in the tray. I dont see in Etsy to purchase is it available?
PolushkaBunny Patterns
Oct 7, 2020
yeah this pumpkin pattern will be available soon I guess in my next blog post Tthanks for your nice words ♥ i am working hard you guys to enjoy it :)
Tamzing M
Oct 6, 2020
They're all lovely & hopefully I'll get to make a few of each! The large pumpkin in particular is wonderful, I think it would look lovely in my windows at Halloween... Thanks for the patty pan squash pattern, it's very unique!
PolushkaBunny Patterns
Oct 7, 2020
thank you so much, dear, i also like them a lot. my house looks super cozy now :)
I just love to create all these little things, and i am very happy you guys like it! ♥
No Name
Oct 8, 2020
They are so cute I will try one Thank you !
PolushkaBunny Patterns
Oct 10, 2020
I'm so glad you like it! 😀❤❤❤
Susan Richards
Oct 10, 2020
Thank you!!!!
PolushkaBunny Patterns
Oct 14, 2020
You are welcome dear ❤☀️☀️☀️☀️
Lilly
Jul 31, 2022
The patterns of this designer are simply amazing !


.png)